Tuesday, June 24, 2025

Sometimes TV gets it right

Of course it's anime

I learned to suspend my critical thinking skills watching movie or TV scenes featuring a computer back in the IBM PC era. At the time, any shot of someone working on a computer was invariably paired with CLACKY TYPEWRITER NOISES, since how else would the audience know they were doing computer things?

Crack into that super-secret defense system by randomly guessing passwords because there's no lockout or MFA in TV Land? I can ignore that. IPv4 address octets > 255. No problem (though I do want a scene where a developer from the 1980's, thawed out of suspended animation, screams in horror at the sight of an IPv6 address).

At the same time when a TV show gets it right deserves praise, given the huge influence media has on public perception of technology. 

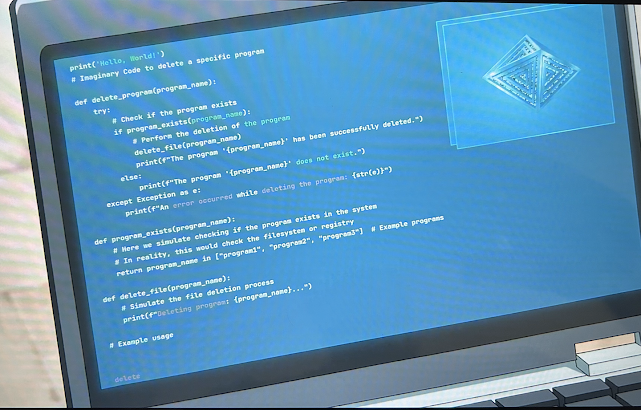
This is from Kowloon Generic Romance, episode 12:

Laptop displaying Python code

Not only is this valid Python code, whoever wrote this ensured it was harmless- because they knew someone would run it as-is.


Monday, June 23, 2025

Homelab Adventures, part 6: Playing with Proxmox VM management

Herding the cats VMs

Before doing any more Kubernetes work I need to get my VMs under control. I need a way to group related VMs together, and ideally manage them as a group. I also want to be able to quickly spin up new VM instances.

The first one is easy. I use the pulldown menu in the top left of the Proxmox console to switch to Tag View, and then assign my Kubernetes The Hard Way VMs a tag. I'll label them kthw:

Assigning a tag to a VM in the Proxmox console

To tag a VM select it, click on the pencil icon, and pick the tag you want, or type a new one. As a bonus Proxmox automatically color-codes tags, and groups tagged VMs together.

I can work on these VMs as a group in bulk operations by specifying the tag. For instance, I can start all the Kubernetes The Hard Way VMs in one operation by choosing kthw in the "Include Tags" box of the Bulk Start dialog:

Proxmox bulk start dialog, with all VMs tagged kthw selected

This gives me what I need to manage my VMs.

Send in the clones

Proxmox will let me convert any VM into a template, which I can then use as a base for additional VMs.

First I create a new VM, using the same Debian 12 install iso as before. I make two changes in the install process: I manually partition the virtual disk to eliminate the swap partition, so I don't have to manually disable swap post-install, and I skip installing the "Debian Desktop" software.

Once the install completes I log in to the VM, do the usual steps of enabling root ssh logins adding my local user to the sudo group, and installing some essential software:

# Truncate the too-verbose motd
echo 'Your motd here' > /etc/motd

# Essential software
apt install curl git zip unzip

# Cleanup
apt update
apt upgrade
apt autoremove

Let's see how big the VM is:

root@debian12:~# df -k /
Filesystem     1K-blocks    Used Available Use% Mounted on
/dev/sda1       32845584 1807868  29343716   6% /

Plenty of room for additional software.

Now stop the VM, right-click on the VM name, select "Convert to template", and behold:

Proxmox VM window, showing a template VM

I've given my template a name reflecting its creation date, since the VM can no longer be updated after being converted to a clone.

I've got my VM tools ready. Time to attack Kubernetes again.

Wednesday, June 04, 2025

Homelab Adventures, part 5: Rocket Surgery

 More memory, same problems

Over the Memorial Day weekend, I find an eBay store selling compatible ECC DRAMs for a surprisingly low price. I grab two 8gb sticks- the Dell requires memory to be installed in pairs- for the price of a couple of pizzas.

I also track down a pdf of the Dell machine's manual and copy it to a directory on my home file server. I've been doing this with manuals for a few years with manuals, especially those odd little devices whose documentation consists of one big foldout page that I usually wind up losing. I'm running nginx to serve these up, so I can view them from a browser any time I'm on my home network.

Once the memory arrives, I power down the Dell and pop open the case. 

The connectors on the slots for each memory lane are color-coded:

Interior of Dell server, showing the motherboard and a large airflow guide

The grey thing on the lower left is an airflow guide forcing cool air over that ginormous heatsink. It's got a clever quick release mechanism (not shown), and once I pop it off I have easy access to the memory slots:

Dell server mainboard, showing memory slots

Firmly press in the new memory sticks, close everything up, and behold!

BIOS boot screen showing 18gb of memory

It takes several minutes for Proxmox to spin up all four VMs. I wait a bit longer for the Kubernetes services to chat with each other, and login to node-0. I get a login prompt in a couple of seconds, and, overall, the system is pretty responsive- much better than before

I still have the same error, though:

networkReady="NetworkReady=false reason:NetworkPluginNotReady message:Network plugin returns error: cni plugin not initialized

I decide to do some housekeeping before digging into this further.

First, I apply the latest firmware update, from 2018. From the release notes this primarily addresses some of the speculative execution bugs that have been discovered in Intel processors over the years. While this won't fix my Kubernetes problem, it might give me a slight performance boost, since sometime the Linux kernel enables software mitigations for unpatched firmware bugs. 

And it's just good computing hygiene.

Dell provides a convenient Linux executable to apply this update from the command line:

root@vega:~# ./T110_BIOS_C4W9T_LN_1.12.0.BIN 
Collecting inventory...
.
Running validation...

Server BIOS 11G

The version of this Update Package is newer than the currently installed version.
Software application name: BIOS
Package version: 1.12.0
Installed version: 1.3.4

Continue? Y/N:y
Executing update...
WARNING: DO NOT STOP THIS PROCESS OR INSTALL OTHER PRODUCTS WHILE UPDATE IS IN PROGRESS.
THESE ACTIONS MAY CAUSE YOUR SYSTEM TO BECOME UNSTABLE!
.......................................................................................

I then do some tinkering with the CPU settings of the VMs. While I was researching the virtualization capabilities of the Dell's Xeon CPU I discovered that Xeon "Lynnnfield" processors are part of the "Nehalem" processor family, which is one of the CPU options in Proxmox' VM configuration.

I stop node-0, change it's hardware processor setting from "Conroe" to "Nehalem", and restart it. 

It works! lscpu identifies the processor as Intel Core i7 rather than Celeron, and the CPU flags show SSE 4 as being supported.

Next, I'm going to explore Proxmox further. I want to create a VM template so I can quickly spin up clean VMs, and see if I have better success with minikube or k3s than I have with the full Kubernetes distro. Hopefully, having a working Kubernetes install to compare against my current one will give me enough clues to identify the problem. 

At worst, I'll have a working Kubernetes- just not the one I expected.